Monday, August 9, 2010

Weekend work

I've gotten my track laying technique down so the pace is picking up.  Just as I was starting to think that I'm going to be still laying track into 2011.

Here are my steps -

Roadbed work
  • glue down roadbed (using the clear caulk)
  • use a can of soup or whatever - I'm partial to a tuna can, classier I think - to roll the roadbed flat in the glue
  • let it dry for a while with weights (same cans of course!)
Track work
  • get the small track connectors ready - meaning that they can go onto the track tightly.  I'm using the ME code 55 connectors and they're really tight, so much so that they require a bit of 'work in' before they'll go on.
  • Weather the switches if they're in visible ares.  I'm using the ME weathering solution.  The flex track is already weathered.
  • solder tracks together if its a big curve, or just a long stretch.
  • fit all the pieces together, work the curves, make sure the ties are evened out after all the bending and such
  • move everything out of the way, put down a thin layer of caulk. 
  • connect the track to the existing sections, make sure everything is ok, then put weights on the new gluing areas.
The nice thing about (finally) getting comfortable laying track is the ability to make changes and do things on the fly a bit.  I added an extra turnout in the southern staging area.  I checked my inventory of switches and I've got a couple spares, so bam! done.

So Saturday and Sunday I managed to get the Fergus industrial spurs complete.


I also fixed up some track issues on the main line, put in some more electrical feeders.

Sunday, August 1, 2010

A short discussion on New vs Old Schools

Oh and I'm not talk break dancing.
 
I'm talking about controlling switches (aka turnouts), pictured below.

So old school model train people are hooked on these things called Tortoises

The new school is moving to Servo's.

So what's the difference?

Well, it cost me 2.49 cents for 1 servo made in China, shipped from Hong Kong.  A tortoise costs about $15-20.  Of course both require something to control them via the DCC control bus.  Either way its about 6 bucks per switch.  So my cost per remote controlled switch is roughly $9 using servo's, vs $24.

My question is why on earth would anyone use the old ways anymore?  I've noticed that most of the guys doing MR are very very very very very conservative.  There's some great wars on the forums when people bring up the future.  Its a hoot listening to the old curmudgeons arguing that they 'don't need no new fangled devices'  'DC is still the best, 'cause why would you want to control more than 1 engine? crazy young whippersnappers'


Couple of the 50 servo's I got from Hong Kong. I'll put another post up on how I'm controlling them and the products I decided to use.
 
Now I'm off to perfect my moonwalk.

More Trackwork

A brief history of trains (mine at any rate)

When I first put track down 12 years or so ago, I did what I was told by the LHS guy (local hobby store - you have to acronym-ize everything you know).  He and I worked out a trackplan based on Flex track (the Code 80 stuff)  that could be expanded and would be pretty easy for me to do.  So the theory went!  This was back in the days of DC... DCC was around but was in its earliest incarnation and expensive.

DC vs DCC

Ok, real short chat about these two words.  DC is direct current and is the original way toy trains were made.  The voltage on the rails tell the train how fast to go, more juice the faster the little engine spins.  So if you wanted to run two engines they would run at the same speed.  The only way to control multiple engines at different speeds was complicated "power zones" and you could still only have 1 independent engine in each zone.  Very sucky.  DCC changed all that.  Every engine could be controlled individually and a few other perks since they all had microprocessor controls and such.


Here's a picture of what I'm talking about.   This is my MP-15 switcher taken apart.  You can see a green line on the engine.  That's a DC controller circuit board.   The next picture below is a Digitrax DCC controller board]


Right back to the story of my first layout! DCC was new but was expensive so I went DC.  With the trackplan in mind I purchased everything he suggested.  Then I got to work. Boy was that an interesting experience.  I used nails to put the track down - holy crow that was nuts!    I also didn't know the trick about laying track around curves.  That really ticked me off.  I ended up with piece of track that stopped right in the centre of the curve.  I had to fasten a new piece onto it - had to match the curves and then get the little things to align.  Oddly enough it didn't come out at all!  So I had a track that my train couldn't use.   Took the wind out of my sails a bit you know?  If my terrain didn't turn out so damn good I'd probably have given up.  but that's another story, let's get back to track laying.


And Now...


I spent a long time reading stuff on the internet.  Apparently there's all sorts of stuff on the internet !  some of it is actually really useful.  Anyway, learned some tips and tricks to laying track, and all that.


I'm using a non silicon clear chalk to stick the roadbed down, and then the track on top.  No stupid little nails, which really means I wasn't playing meat tenderizer to my fingers this time around.  That and it takes a lot less time to get the track down.  Oh and mistakes - seriously, I've made 1 or two - are pretty easy to fix.


This picture is the mainline at zero elevation going into the Fergus station (which will be on the right), it will also be used as a siding if passing is necessary.  I just got this down, looks great I think.


Sunday, July 18, 2010

Stories from the Track

The first day I had to lay some track went really really slowly. I had my cork put down with 12 year old white glue. Yup, 12 years old, still worked fine. Impressed me too. The cork was a 4' by 2' sheet that I got from Michaels Art store. Its 1mm lower than 'normal' track cork.

I suppose I should take this time to point out what cork is, why I'm using it and alternatives. Cork, not to be confused with the city in Ireland (which coincidentally I've been to) is used in MR to create a sub-road bed. Real railroads are built on beds of gravel to control water drainage, just like car roads. Ok I'm over simplifying the building process, but that's it. Water control. Except a railroad has to deal with massive weight at great speeds. The speed makes things rattle and move, not great from an engineering perspective. Wooden ties are great for keeping vibrations down, though there are new cement ones now that work and are better. wow do I get off topic.

The cork for model railroads is used for two main reasons - 1) to give the bevel effect so that it appears that its real and 2) to dampen the noise of the trains running on bare wood - again realism.

There are options - not use anything, use foam board instead of traditional lumber as the base for everything or use a foam subroad replacement.

I went with cork. So I bought two types, one for the 'yard' layout, that's the big sheet since there's a lot of track in the space and the stuff that goes under the track when it leaves the yard.

Here's a picture of the second type, the one specifically made for N scale track.


From Trains 2010


I've since discovered that I bought way too much of the one and not enough of the other. Naturally.

I spent a couple hours aligning my first track bits, re-doing it, checking, measuring over and over again. Then glued it down. Then I realized that I didn't think about my under the table servo that would operate the switches automatically. Drat. and my servo's were still being shipped from Hong Kong (2.49 each thank you very much!) so I didn't know what or how much clearance they'd need. So I dithered a bit for the next week, got another three or four feet of track down while I waited.

All in all felt super unproductive.

Thursday, July 15, 2010

Track work!

I have to admit that I was a bit intimidated thinking about all the track work that I have to do. Something I haven't touched in ... oh 12 years ! There's been all sorts of progress in the MR world. There's new track that looks really realistic now. After much research and reading it seemed that I should buy something called Code 55 flex track. The stuff that I was used to is now (or probably always was, I was just completely unaware) called Code 80. What the hell does that mean you ask. Its the height of the track... 55 is more realistic and is much lower. Here's a pic. 55 is on the left, 80 is on the right. If you look enough you'll notice it. It's more in your face if you actually see the two. Maybe I'll take my own picture, but until then here's one that kind of shows what the heck I'm going on about.


Hard to tell from the picture but 55 is all that to MR's in N scale. The stuff pictured above is KATO uni track that has a grey plastic base. Its all the rage too. Naturally, I choose differently. I'm a trend setter not a follower! Anyway, I decided to go with Atlas track - at least I did until I discovered that there isn't any to be found and they experienced a manufacturing problem in their Chinese plant. Its been about 8 months since anyone has been able to purchase it. Sucky. Its the cheapest and apparently decent. So I looked at PECO, an English brand that is based on English tie widths (ties are the thingies between the rails keeping them apart), so they don't look quite right. Then I found a lot of references to Micro Engineering and their quality product. They also made it 'weathered', meaning it looked realistic and beat up. The cost wasn't too much higher, so I got it. The switches/turnouts are from Atlas though, as they were still available and fit the ol' budget.

Anyway it really was exciting when everything showed up in the mail, totally felt like a kid at Christmas again!! Sure my visa bill was scary but heck ! that's another month away. Anyway here's a shot of me getting some track down.


You can see that I used a printout of my layout plan. I used a free (of course) program called Xtrackcad that has the ability to print 1:1, so the track was life sized. This really makes the transfer of my ideas to the actual table really easy.

Foundation Continued

and now for the Benchwork

There are various types of benchwork involved in MR (that's the lingo for Model Railroading). You've got the open gridwork bench, the shelf layout, the table top style, and some hybrid. I've gone hybrid, though its mostly table top built on top of gridwork. Why? I wish I had a great reason but reality is... 'cause that's the way it turned out. Most of the layout is flat, so an open grid isn't necessary. But the raised and rising bits need, or are better suited for the grid so I've got it where I need it.

I still had my benchwork that my father and I built 12 years ago, a collection of 3 tables of open gridwork that have survived 3 house moves. That was my base around which I built the rest of the layout. Armed with a list of material needs and calculations I headed to Lowes with my father inlaw to get the goods. This required me taking the booster seats out of the CRV... never much fun but a necessary evil. Fortunately I, for once, measured properly and everything fit in and an hour later I had all the stuff into the house. That was Friday night.

Saturday and Sunday were build days. I mostly used a cheap-ass mitre saw that can't cut a staight angle to save its life. Fortunately benchwork ain't fine cabinetry, so everything (roughly) worked out.

It was actually pretty cool building it, and considering the crap tools that I had to work with, it turned out pretty damn good. Bit of self back patting there. oh did I mention everything came out level !? true.

Here are the results

From Trains 2010


2 x 4's against two walls as braces, one is lower on purpose... that section is the 'gorge' part of the Elora Gorge. You can see one of the pre-built tables on the left


Foundations

Ok, here's the first post. I'll be jotting down bits about all the fun I'm having with my trains. Naturally I've been busy with the actual doing, not so much with the documentation (that being this blog). So I've got a couple weeks, ok - months, to review.

The Planning

So I'd been tossing around a lot of various track plans and ideas. Then in the middle of my almost completed idea, there was a change of location. The empty basement apartment was re-zoned back to being a basement apartment for my uncle in law until he finds a place. Probably a year more or less. So instead of my new hobby suddenly getting - wait for it !!! -- derailed --(gosh I'm a hoot) my understanding wife said 'use the kids upstairs playroom'. Ok that reads more monstrous then it really is. The kids are 19 months old and play in the living rooms downstairs right now and will for years. Let's be honest, my progeny aren't going to be left alone in a room upstairs at least until they're 6. Even then I'm sure I'll have to install camera's to make sure that no explosives or weapons are being used.

I figure I've got 4 or 5 years before I'll have to move or re-do the layout if I go into the playroom, which is fine. I NEED to have a hobby that doesn't involve my computer (well, I do plan on automating things, but I digress) or a lot of noise after 7pm. That's bedtime for the kids. Which means that although I love pool, and would love to practise, it's unfortunately a bit loud as the billiard room is next to Greyson's room. The pool room is on the second floor of the house - unusual but that was the best spot for it.

Anyway, back to the trains - I've gone through 8 major revisions, with countless minors before deciding on this plan. During the many many hours I've spent perusing the Internet forums on N Scale trains or just model trains in general there seems to be a standard on layout designs. Its broken down into Givens and Druthers. Givens, being, well, must have's, and druthers, the rather nice to have but its ok if they never come about. So with that in mind, here are mine.

Givens

  • Era being modelled is post 1970's. I say that because I've aiming for anything modern, specifically after the 1990's but I have two C630's (a type of locomotive) that were discontinued shortly into the 70's in CP Rail's inventory that I rather like.
  • Modelling a fictional line of CP Rail that would run around southern Ontario and the Niagara escarpment. So Hamilton, Kitchener, Waterloo, Dundas, Elora / Fergus, and where ever else I happen to like.
  • All turnouts or switches on the layout are powered
  • 1 mainline and ability to run a couple trains by computer without worrying about collisions (without getting into block detection yet)
  • running freight and some passenger (VIA or GO, maybe both.. I know VIA is CN...)
  • freight yard interchange with CN Rail, just 'cause CN is so ubiquitous in S. Ontario.
  • various heights with a couple bridges and tunnels
  • city scape modelling
  • countryside modelling
  • yard for operational fun
  • hookup to the computer for automation
  • DCC (digital train control, versus the really old school DC)
  • Minimum 15" radius for Mainline
  • Minimum 10" on side / industry spurs

Druthers

  • double mainline
  • signals
  • train ID'ing in realtime (thinking RFID, but might have to go IR or ???)
  • block detection - I haven't decided on the system but it should go hand in hand with ID's
  • wireless train/layout controls with Itouch, Ipad or Iphone. Google Android is also a thought
  • using JMRI or Rocrail as software controls
  • webpage with ability to control layout remotely
  • web cam's for 'on the scene' action
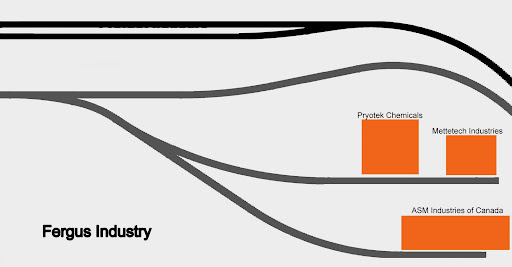
The Layout Plan


The notes - blue is the lower or zero elevation, Green is the higher bits representing the escarpment. It will be about 12" up from the blue.
There's a red line near the bottom, that's going to be a scenic backdrop - everything behind it is going to be staging yards representing the rest of the world... so trains can go south and then new trains can come North. Maybe I'll do up a better layout diagram...