Monday, August 9, 2010

Weekend work

I've gotten my track laying technique down so the pace is picking up.  Just as I was starting to think that I'm going to be still laying track into 2011.

Here are my steps -

Roadbed work
  • glue down roadbed (using the clear caulk)
  • use a can of soup or whatever - I'm partial to a tuna can, classier I think - to roll the roadbed flat in the glue
  • let it dry for a while with weights (same cans of course!)
Track work
  • get the small track connectors ready - meaning that they can go onto the track tightly.  I'm using the ME code 55 connectors and they're really tight, so much so that they require a bit of 'work in' before they'll go on.
  • Weather the switches if they're in visible ares.  I'm using the ME weathering solution.  The flex track is already weathered.
  • solder tracks together if its a big curve, or just a long stretch.
  • fit all the pieces together, work the curves, make sure the ties are evened out after all the bending and such
  • move everything out of the way, put down a thin layer of caulk. 
  • connect the track to the existing sections, make sure everything is ok, then put weights on the new gluing areas.
The nice thing about (finally) getting comfortable laying track is the ability to make changes and do things on the fly a bit.  I added an extra turnout in the southern staging area.  I checked my inventory of switches and I've got a couple spares, so bam! done.

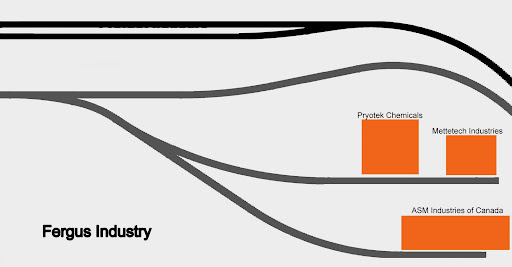
So Saturday and Sunday I managed to get the Fergus industrial spurs complete.


I also fixed up some track issues on the main line, put in some more electrical feeders.

Sunday, August 1, 2010

A short discussion on New vs Old Schools

Oh and I'm not talk break dancing.
 
I'm talking about controlling switches (aka turnouts), pictured below.

So old school model train people are hooked on these things called Tortoises

The new school is moving to Servo's.

So what's the difference?

Well, it cost me 2.49 cents for 1 servo made in China, shipped from Hong Kong.  A tortoise costs about $15-20.  Of course both require something to control them via the DCC control bus.  Either way its about 6 bucks per switch.  So my cost per remote controlled switch is roughly $9 using servo's, vs $24.

My question is why on earth would anyone use the old ways anymore?  I've noticed that most of the guys doing MR are very very very very very conservative.  There's some great wars on the forums when people bring up the future.  Its a hoot listening to the old curmudgeons arguing that they 'don't need no new fangled devices'  'DC is still the best, 'cause why would you want to control more than 1 engine? crazy young whippersnappers'


Couple of the 50 servo's I got from Hong Kong. I'll put another post up on how I'm controlling them and the products I decided to use.
 
Now I'm off to perfect my moonwalk.

More Trackwork

A brief history of trains (mine at any rate)

When I first put track down 12 years or so ago, I did what I was told by the LHS guy (local hobby store - you have to acronym-ize everything you know).  He and I worked out a trackplan based on Flex track (the Code 80 stuff)  that could be expanded and would be pretty easy for me to do.  So the theory went!  This was back in the days of DC... DCC was around but was in its earliest incarnation and expensive.

DC vs DCC

Ok, real short chat about these two words.  DC is direct current and is the original way toy trains were made.  The voltage on the rails tell the train how fast to go, more juice the faster the little engine spins.  So if you wanted to run two engines they would run at the same speed.  The only way to control multiple engines at different speeds was complicated "power zones" and you could still only have 1 independent engine in each zone.  Very sucky.  DCC changed all that.  Every engine could be controlled individually and a few other perks since they all had microprocessor controls and such.


Here's a picture of what I'm talking about.   This is my MP-15 switcher taken apart.  You can see a green line on the engine.  That's a DC controller circuit board.   The next picture below is a Digitrax DCC controller board]


Right back to the story of my first layout! DCC was new but was expensive so I went DC.  With the trackplan in mind I purchased everything he suggested.  Then I got to work. Boy was that an interesting experience.  I used nails to put the track down - holy crow that was nuts!    I also didn't know the trick about laying track around curves.  That really ticked me off.  I ended up with piece of track that stopped right in the centre of the curve.  I had to fasten a new piece onto it - had to match the curves and then get the little things to align.  Oddly enough it didn't come out at all!  So I had a track that my train couldn't use.   Took the wind out of my sails a bit you know?  If my terrain didn't turn out so damn good I'd probably have given up.  but that's another story, let's get back to track laying.


And Now...


I spent a long time reading stuff on the internet.  Apparently there's all sorts of stuff on the internet !  some of it is actually really useful.  Anyway, learned some tips and tricks to laying track, and all that.


I'm using a non silicon clear chalk to stick the roadbed down, and then the track on top.  No stupid little nails, which really means I wasn't playing meat tenderizer to my fingers this time around.  That and it takes a lot less time to get the track down.  Oh and mistakes - seriously, I've made 1 or two - are pretty easy to fix.


This picture is the mainline at zero elevation going into the Fergus station (which will be on the right), it will also be used as a siding if passing is necessary.  I just got this down, looks great I think.